
The purpose of this article is not to provide step-by-step instructions, rather, it is to document for you the process I used in prototyping a Magyar headdress of the Conquest Era. You may have a better and more authentic way to construct one. In that case, I really do hope that you’ll share.
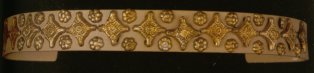
 |
| The completed project – a prototype headdress. |
This project came about because of my frustration with keeping a veil on my head. My past options in the head wear department were braids with braid-ornaments but otherwise bare-headed or full hat-veil-braid ornament ensemble. It’s a look I liked, but a fur-brimmed wool felt hat is, um… warm. To say the least. And one really can’t take off the hat-veil part without suffering through the entire bad-hair thing.
Thankfully, there was another option, which was to construct a magyar headdress. It was time to do the research and get around to actually making one.
Research
| Hajdúdorog-Gyúlás |
 |
| Grave 25. Gilt Silver. 1.8 x 2.1 cm and .7 cm |
I chose to base my prototype headdress on the mid-10th century Hajdúdorog-Gyúlás find. This find came to light in 1993. Its sixty-five graves were completely excavated between 1993-1995 by Antal G. Fodor. Other artifacts recovered from the same grave as the headdress were circular silver wire earrings and a double row of silver gilt dress mounts, some of which had pendants decorated with a trefoil palmette.
This headdress had thirteen silver gilt lozenge-shaped mounts. Each of these had four small loops on the back for attachment. The mounts were placed with their tips touching in the middle of the headdress. There were twenty-one small, round silver gilt rosette mounts placed in the space between the larger mounts. These smaller mounts had a single rivet for attachment.
Supplies and Tools.
One of the nice things about making accessories is that they are not very supply- and tool-intensive projects.
 |
| Tools and Supplies |
Supplies
Fabric
Scrap leather strap
Nailheads
Thread
Embroidery floss
Beads or pearls
Tools
Scissors
Wooden or metal pushy thingy
Sewing needle
Beading needle
Nailheads
In leu of actual cast metal mounts, nailheads are a magyar personas best friend. These little metal ornaments come in a variety of shapes, sizes and finishes. Thanks to the popularity of scrapbooking and a product called the Be-dazzler, they are fairly easy to find. I purchase my nailheads from an An Tir SCA merchant, Pastiche Inc.. They carry a large, inexpensive selection of the styles that are most easily adaptable to SCA ornament. I have also found nailheads online through Ebay andFroogle (A Google-owned search-engine geared toward online product sales).
| Obligatory disclaimer: I don’t personally endorse any company or product… blah, blah, blah… purchase at your own risk… yadda, yadda. |
There are three basic types of nailheads – those for use on fabric, those for use on paper (scrapbooking), and those for use on leather or upholstery. The fabric ones have small, sharp prongs on the back that you bend inward to catch the fabric threads. The kind for use on paper don’t have any prongs at all, and the kind for use on leather have monster-big prongs or rivets suitable for puncturing thicker materials.
 |
| A Plethora of Nailheads |
When purchasing nailheads, I stay away from anything too obviously modern in design such a stars, moons and leaves. I tend to select simple geometric shapes that might be ornamented with filigree, granulation, simple floral designs, ridges or grooves. Domed circles are pretty easy to find and they show up a lot in extant finds. Squares can be turned on point to simulate diamond shapes.
For this project, I chose square and round nailheads in gold from my stash because they were the right color, size and shape. These nailheads were intended for use on fabric.
Putting it together
Since the nailheads have to be mounted on fabric, I dug through the piles of silk, linen and wool in my sewing room. Wool I discarded immediately because I don’t like it in direct contact with my face. Linen would be cool in summer, and I had a lovely piece of indigo linen that would contrast well with either the gold or silver nailheads. In the end, I selected a cinnamon-colored silk noil to act as a base. This is one of my favorite colors and it goes well with my skin and hair. Vanity, thy name is Khalja.
The Magyar had access to silk through Byzantium, though the material wasn’t at all like a noil. The noil gives a suede-like effect that could pass for leather from a couple feet away, though that’s not really my intent. The color is similar to one that can be achieved with a dye bath of madder and sorrel (rose mixed with brown).
I cut a strip of pre-washed fabric and serged the edges. To get the width of the fabric strip, I wrapped it around the scrap leather strap 1 1/2 times. My final dimension ended up being about 2 5/8 inch by 45 inches.
 |
| Back, showing nailhead prongs and wooden pusher thingy. |
Starting in the center, I set the first square nailhead. Using my wooden tool, I pressed the nailhead prongs toward the center of the metal mount, catching the threads of the material. Working outward, I set each square mount, corners touching, taking care that they remain oriented correctly.
 |
| Some of the round mounts set. |
I ended up placing fifteen square mounts, two more than on the original. Once all the square nailheads were set, I added the smaller round nailheads in the “V” made by the bigger mounts. As I am not trying to make an exact replica of the extant piece, only trying to capture the “flavor” of the original, I didn’t duplicate the placement of mounts exactly. Setting the mounts took about an hour.
With all the square mounts set, I flipped it wrong side up and pressed one of the serged edges in toward the center. Wrapping the fabric around the leather, it was pressed again, still upside down, making sure the mounts were centered correctly on the front.
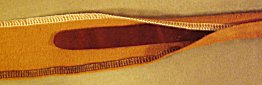 |
| Leather strap, wrapped with fabric. |
The ornamented fabric is very heavy. The purpose of the leather strap was to provide additional stability to keep it from distorting the fabric and crumpling together. The length of the strap, by the way, is about three inches less then the circumference of my head. It’s width is about 3/4 inch.
Once the fabric was pressed, hiding the machine sewn edges, I whip-stitched it closed with matching thread. Since I didn’t pin the fabric, it seemed easier to work from the center out.
 |
| Back side, showing closing stitches. |
Currently, I’m free handing some scrolling embroidery in yellow linen thread. I might also add some pearls, or a couple more of mounts and perhaps some tassels on the ends. I’ll put a picture of the finished project soon. I promise!
 |
| First embroidery attempt |
I removed the yellow linen stem-stitched embroidery, feeling that the freehanded design was a little too meandering, and the stem stitch didn’t work very well around the curves of the motif . After drawing the scrolling design with a tailors pencil, I used a chainstitch in two tones of green cotton floss to complete the embroidery. The tassels are made of the same thread.
As you can see, there is no additional beading. I tried a variety of beading designs, with different sized metallic beads and freshwater pearls, but didn’t really like any of it and I felt that it might interfere with my ability to tie the headdress on.
 |
| Completed embroidery |
If you have any questions on this project, feel free to contact me. I would love to see pictures of any headdresses you might make based on the information on this page.


