
These early 10th century Magyar earrings can be made quickly and easily using commercially available findings or you can fashion your own findings from raw materials.
Supplies you’ll need:
8 – 5mm silver beads
2 ft – 20 gauge brass wire -or- 8 gold-colored coiled wire beads
2 hoop earwires
2 – 3 inch headpins
For a more period approach, skip the earwires and headpins. Instead purchase:
1 ft – 20 gauge silver wire
gold leaf (optional)
gold size (optional)
Equipment list:
1 pair small wire cutters
1 pair flat nose pliers
1 pair round nose pliers (optional)
1 small fine flat file for metal
The Coiling Gizmo or a tiny diameter rod of some sort
The Research
Karos II L. 8.4 cm |
Our recreated earring is based on one recovered in the 1930s from the site known as Karos II. Archaeologists feel that the first interments in this cemetary probably took place in the last years of the 9th century and it remained in use until the mid-10th century. The Karos finds are some of the richest in terms of the quantity and quality of artifacts that have been uncovered to date.
Persons of all social levels were laid to rest in this location; from rich warrior/nobleman to free middle class to servant. This particular set of earrings were uncovered in Grave 27 of the second set of burials. Unfortunately, I don’t have any information on the social status of the individual in this grave.
The archaeological record indicates that the round beads of the earrings were made of two hollow semi-spheres of silver that were fitted together and then strung on wire. Thin wire was wound between the beads. These wire coils were gilded but only tracing of this gilding survived.
Gilding is an ancient form of embellishment and is a process which adheres gold to a surface. Gilding falls into two categories; mechanical and chemical. As yet, I have been unable to discover with certainty by what means Magyar craftsmen gilded their work. The fact that little gilding survives on the extant piece may indicate that this object was gilded by mechanical means.
A couple of notes
The quickest and easiest way to put together these earrings is undoubtedly by using commercially available findings. However, I’d really like you to think about making your own findings from raw materials. You will certainly achieve a more authentic look. Honestly, making your own findings isn’t hard. I was surprised to find that it’s just snipping some wire and bending it in the desired shape.
A note on working with wire: The more you work with wire, the more brittle it becomes unless you apply heat. (A process called annealing, but I’m not going to get into that here.) Just remember this as you play around. Try not to work it too much because it will snap.
Step One – making coiled wire beads
Skip this step if you’ve purchased beads that look like coiled wire.
 |
| Coiling wire. |
Wind some of the 20 gauge wire onto your rod or the Coiling Gizmo. Do not try to wind onto the headpin because it’s not strong enough. In my first attempt, I used a 1/16 hex key wrench instead of the coiling thingy. It’s the right diameter, but the ridges make it difficult to get the wire off.
Wind about 3 to 4 inches or so of coil. Make sure to reserve at least 14 inches of wire for the earwire and headpin if you plan to make your own. Cut the wire from the spool and slide the coil off the rod.

Dividing the coil and cutting it apart.
Divide the coiled wire into beads of about 5mm or so. Cut them apart using the wire cutters. Make eight of these beads.

Shaping the coil.
Using your flat nose pliers, smoosh the cut ends of the beads down flat. Use your metal file to smooth the ends a bit.
Step Two – making the headpin and earwires
Skip this step if you purchased commercially available findings.
 |
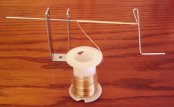
| Earwire |
Snip a 3 1/2 inch piece of 20 gauge wire. Round the ends with your file a bit. Using your fingers, bend the wire into an oval shape, with one “arm” longer than the other. Use the photograph at top for reference. It will come out looking like a one of those bits of wire that use to hang christmas ornaments. Make two of these.
Snip 2 – 3 inch pieces of 20 gauge wire. Using your round nose pliers, bend one end of the wire (about 1/2 of an inch) into loop. Wrap the tail around the rest of the wire. Make two of these.
 |
 |
| The loop with “tail”. | Finished loop. |
Step Three – the bead row pendant
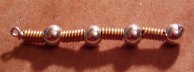 |
| The finished pendant |
String your beads on the head pin. Start with a coiled wire bead and alternate with a round bead until you have four of each. You should have about 1/2 or better of headpin left when you are done. Using the round nose pliers, bend the wire so that it makes sort of a “J” shape around the round bead. You don’t want the beads sliding around on the head pin, so make your hook fairly tight.
Attach the pendant to the earwire you made earlier and you’re in business.
| Complete |
Final Notes
Even thought the extant example doesn’t show it, you might want to consider working out a method so that your pendant doesn’t slide off the earring. This could be achieved by making sure the headpin loop is pretty tight. Or by making a tiny bend or hook in the shorter end of the wire.
I have not tried using gold leaf on the coiled wire. All of my samples to date have been made with brass wire. If you wanted to do it, my guess is that you would just need to apply the gold size to the beads, allow it to dry and then apply the gold leaf similar to the directions found here. If you decide to give it a try, let me know.


